Swiper是一个很常用的用于实现各种滑动效果的插件,PC端和移动端都能很好的适配。
官网地址:www.swiper.com.cn
目前最新版本是Swiper7,但众所周知最新版本通常不稳定,所以这里使用Swiper6来封装。
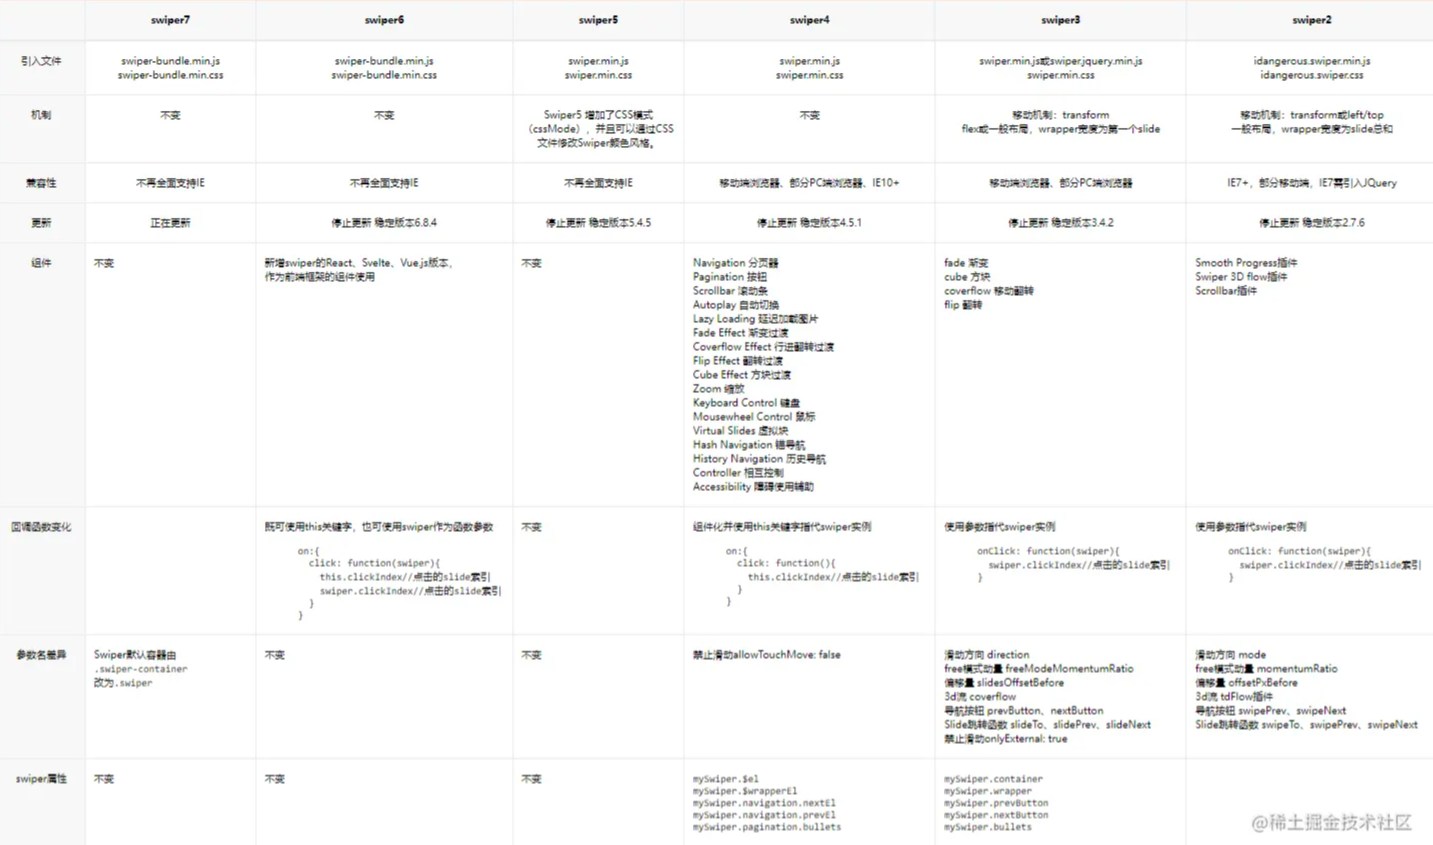
Swiper各版本区别:

为什么要封装组件
因为网页中通常不止一个地方需要用到轮播图,所以直接将轮播图封装成一个共用组件,性能会更好,修改起来也可以快速找到位置。
开始封装
1.下载安装Swiper
 npm install Swiper@6// @6 是指定版本号为6 的意思
 cnpm install Swiper@6
 yarn add Swiper@6
2.引入css样式文件
import "swiper/swiper-bundle.min.css";
3.引入js文件
import Swiper from 'swiper/swiper-bundle'
4.把官网使用方法中的HTML结构复制粘贴过来
官网使用方法
注意:
下面不是官网使用文档的代码,是我改动过的!这里的顶层容器类名,不对应的话,后面出大问题!!!
这里官网的使用方法上的容器类名是swiper,对应Swiper7。
但因为这里我下载的是Swiper6,所以我改成了它对应的容器类名swiper-container。
Swiper6及其以前的版本都是对应类名swiper-container
// 注意这里容器的类名!!
<div class="swiper-container" ref='Carousel'>
<div class="swiper-wrapper">
//v-for循环生成轮播图片
<div class="swiper-slide" v-for="Carousel in list" :key="Carousel.id">
<img :src="Carousel.imgUrl" />
  </div>
</div>

<!-- 如果需要分页器 -->
<div class="swiper-pagination"></div>

<!-- 如果需要导航按钮 -->
<div class="swiper-button-prev"></div>
<div class="swiper-button-next"></div>

<!-- 如果需要滚动条 -->
<div class="swiper-scrollbar"></div>
</div>
5.初始化Swiper
初始化时间:有图片数据后
但是轮播图的图片通常都是从后台获取回来的,需要确定页面有数据并且DOM结构完全生成后,再初始化。所以最好的方法是: watch监听 + $nextTick
$nextTick: 将回调延迟到下次 DOM 更新循环之后执行。在修改数据之后立即使用它,然后等待 DOM 更新。
原理:watch监听图片数据的变化,$nextTick等到DOM结构完全生成后,立即初始化
watch: {
//list是轮播图数据
list: {
  immediate: true,   //页面初始化的时候就调用一次handler()
  handler() {
this.$nextTick(() => {
  var mySwiper = new Swiper(this.$refs.Carousel, {
direction: "horizontal", // 水平切换选项
loop: true, // 循环模式选项

// 如果需要分页器
pagination: {
  el: ".swiper-pagination",
  clickable: true, //可点击
  type: "bullets", //默认样式 小圆点, 还可选其他形状
},

// 如果需要前进后退按钮
navigation: {
  nextEl: ".swiper-button-next",
  prevEl: ".swiper-button-prev",
},
  });
});
  },
},
  }
自定义效果
上面的样式结构是我自定义过的,不是原本的官方使用文档,初次使用建议先复制官网的看看如果不需要按钮/分页器/滚动栏,可以自己在HTML结构和初始化代码中删减如果想要其他的滑动效果,可以看看官网其他示例进行选择如果想要改变具体样式或者配置,可以看看官方API
完整代码
封装的组件名叫Carousel
<template>
  <div class="swiper-container" ref='Carousel'>
<div class="swiper-wrapper">
  <div class="swiper-slide" v-for="Carousel in list" :key="Carousel.id">
<img :src="Carousel.imgUrl" />
  </div>
</div>
<!-- 如果需要分页器 -->
<div class="swiper-pagination"></div>

<!-- 如果需要导航按钮 -->
<div class="swiper-button-prev"></div>
<div class="swiper-button-next"></div>
  </div>
</template>

<script>
// 引入swiper的js
import Swiper from "swiper/swiper-bundle.js";
import "swiper/swiper-bundle.min.css";

export default {
  name: "Carousel",
  props: ["list"],
  watch: {
list: {
  immediate: true,
  handler() {
this.$nextTick(() => {
  var mySwiper = new Swiper(this.$refs.Carousel, {
direction: "horizontal", // 垂直切换选项
loop: true, // 循环模式选项

// 如果需要分页器
pagination: {
  el: ".swiper-pagination",
  clickable: true,
  type: "bullets",
},

// 如果需要前进后退按钮
navigation: {
  nextEl: ".swiper-button-next",
  prevEl: ".swiper-button-prev",
},
  });
});
  },
},
  },
};
</script>

<style></style>
效果展示
